
So the cutting was going to be a challenge. I had a very limited amount of fabric and a set number of pattern pieces that I absolutely needed to cut. Since I wanted to waste as little fabric as possible, I decided to create a marker. If you don't know what that is, and/or you wanted a detailed explanation of how I went about making my own makers, you can read that post here. Here's what I ended up with:
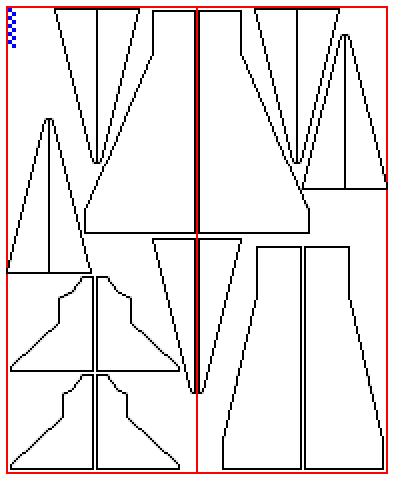 |
| Creating my own marker helped me see that I had enough room for five godets! |
So I cut out all the pieces and started sewing them together. I first attached the godets to the dress panels, aligning the bottoms (which would later turn out to be a mistake). After the godet was inserted into the open seam, I pinned up from the point of the godet up the rest of the seam, like so:
 | |
| 1) Lay out the godet within the seam, not forgetting to true your pieces so the ends all match up nicely. |
 |
| 2) Pin and sew the godet to one side of your seam, right sides together |
 |
| 3) Now do the same with the opposite side. |
 |
| 4) Finally, close the rest of the seam - if you're ambitious you can combine steps 3 and 4. |
Of course, I managed to forget to true the seams, so I ended up with this:


Neither of my seams matched up...
So after I re-finishing all the seams and godets, I cut the sleeves and inserted them. I decided the gown needed something more, though, so I went out to my local fabric store to pick an elegant lining for the sleeves. I was very lucky to find the perfect fabric on sale for $5/yard. It had an elegant border which I decided to use to my advantage.

By placing the sleeve pattern right against the decorative border, once I set the sleeve in, I would be able to wrap the border around to the exterior side. I also used some of the border along the open top seam of the sleeves and around the collar. Here is the end result:
.jpg) |
| The wrapping of the sleeve border is clearer in this picture. |
.jpg) |
| This detail of the sleeve shows what the border looks like on the outside of the sleeve. |
Once that was done I had my cousin come over for a fitting. Unfortunately the chemise was too tight around the bust, and she couldn't easily lift her arms - which was a problem considering she needed to dance in this costume. So, back to the drawing board... After careful consideration I decided not to re-cut the bodice. Instead, I chose to rely on a good old Medieval friend again: the gusset.
As I will explain in my main article tomorrow, gussets can be used in a variety of ways to expand seams where extra movement or give is necessary. These are not to be confused with the godets mentioned above (more here).
 |
| Side view of chemise with arm raised, before expansion... |
 |
| ...and after the expansion. |
Before I added the gusset, the area pulled and tugged around her bust and bicep. After adding the gusset, it fit quite well. I think it's clear from my illustration exactly why it is called a kite gusset.
Once I finished fitting the chemise the second time, I had only to finish the neck. I decided to use bias for that. I made two eyelets near the center of the front bias, then wrapped this around the front of the chemise, where I had already attached the two pieces of cording.
I think the whole thing turned out pretty well, and I heard the dress received nothing but compliments at her Medieval Fair. She was the only one there with a home-made costume.
Stay tuned for the final installment in this exciting series: Pictures!
Nostalgically Yours

Great.
ReplyDeleteI admire you!
I really A D M I R E you!
Your blog is extremely interesting and this post is fantastic.