If you haven't read the first part of this project, you can do so here.
So, now it was on with the pattern! Thanks to the book I won with my Senior Thesis collection at my High School vocational program, Patternmaking for Fashion Design by Helen Joseph-Armstrong, I have a valuable resource on modern pattern making for all of my sewing projects. However, I really wanted to do some research on authentic patterns of the Medieval period in order to get the fit of a real medieval gown. The internet gave me lots of great information, including some stuff I already knew like the popularity of godets. In retrospect I would have liked to have drafted the whole pattern from some similarly-shaped gowns I found online, but after measuring my cousin I noticed she would fit right into a shortened version of the size 6 block I had made in my Sewing Class at AAU last semester.
Can we just let that sink in for a second? My 11-year-old cousin fits into an industry standard size 6. What exactly does that say about our standards of beauty? Moving on...
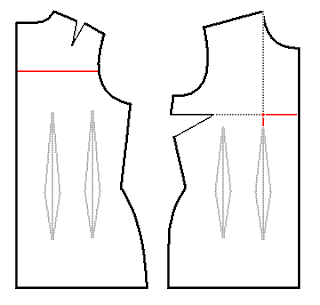
Since I was using my block, I reverted to HJA's book for a silhouette that mimicked the Medieval look. I definitely wanted no darts in the dress, but she needed enough space to dance in it, too. Conveniently enough, there is an entire section in the book dedicated to "Dresses without Waistline Seams", all based on the torso foundation. First I started on the chemise. I decided on a box fit dress: A non-fitted shift without any fish-eye darts. The problem here was what to do with the bust dart, which is still required for the dress to actually contour the bust. Here's where I got clever. Having read that drawstrings were a very common closure in Medieval tailoring, I decided to transfer the bust dart upwards, create added fullness, and have a drawstring across the center front. Brilliant, I know. Here are some illustrations to show my work:

Here I show where I transferred the dart.

Here I've transferred the bust dart upwards, closing the one on the side. I've also eliminated the back shoulder dart, ensuring the shoulder seam is trued. Finally, as per the directions in the book, I added a half inch to the waistlines, blending to zero on the hip and side seams.

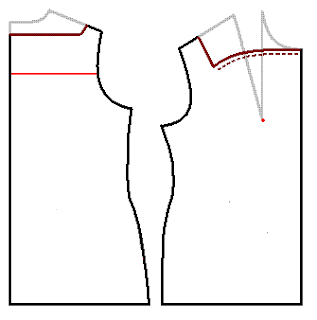
Here I re-drafted the necklines. The front is curved to allow for the bust fullness - once drawn in with string it will lie straight.
For the gown I knew I wanted a lot of fullness, and the fitting wasn't important anywhere but the arms and shoulder, so I went with a tent dress. This is the same basic principle as a flared skirt, except instead of converting just the skirt darts to flare at the hem, one converts all of the darts on the torso foundation to flare by slashing like so:

First I cut along these slash-lines...

...and opened the darts downward, widening the body and the hem...

...and finally I redrafted the neckline to match the chemise.

Don't forget the sleeves! For the chemise I simply redrew the block without the elbow dart. Above you can see what I did for the gown: I redrafted the outer lines to make the long opening at the wrist that was so fashionable back then. Also, I slashed the sleeve down the middle to create an opening along the top of the arm. Here I intended to put in more lacing so the sleeve could be worn open or closed!
As I mentioned, I had done much research in terms of Medieval construction. So none of the gown's pattern pieces were on the fold. "Why?" you might ask. Simple: four seams instead of two allows more room for godets. Also, the closure was intended to be lacing up the front of the gown, so that required an open seam.
Now that I had my patterns designed, my next step was to cut everything out. Some of you might be noticing by now that I have omitted the pattern for the sideless surcote. As it happens I was running very short of time at this point, so I decided instead to make a somewhat more elaborate gown.
More later.
Nostalgically Yours
Read Part III

No comments:
Post a Comment
What do you think?