Tuesday, April 10, 2012
Tweets From Titanic
Wednesday, July 28, 2010
Summer Project #1 - Medieval Dress - Part III
So the cutting was going to be a challenge. I had a very limited amount of fabric and a set number of pattern pieces that I absolutely needed to cut. Since I wanted to waste as little fabric as possible, I decided to create a marker. If you don't know what that is, and/or you wanted a detailed explanation of how I went about making my own makers, you can read that post here. Here's what I ended up with:
| Creating my own marker helped me see that I had enough room for five godets! |
So I cut out all the pieces and started sewing them together. I first attached the godets to the dress panels, aligning the bottoms (which would later turn out to be a mistake). After the godet was inserted into the open seam, I pinned up from the point of the godet up the rest of the seam, like so:
| 1) Lay out the godet within the seam, not forgetting to true your pieces so the ends all match up nicely. |
| 2) Pin and sew the godet to one side of your seam, right sides together |
| 3) Now do the same with the opposite side. |
| 4) Finally, close the rest of the seam - if you're ambitious you can combine steps 3 and 4. |
Of course, I managed to forget to true the seams, so I ended up with this:
So after I re-finishing all the seams and godets, I cut the sleeves and inserted them. I decided the gown needed something more, though, so I went out to my local fabric store to pick an elegant lining for the sleeves. I was very lucky to find the perfect fabric on sale for $5/yard. It had an elegant border which I decided to use to my advantage.
By placing the sleeve pattern right against the decorative border, once I set the sleeve in, I would be able to wrap the border around to the exterior side. I also used some of the border along the open top seam of the sleeves and around the collar. Here is the end result:
![]() |
| The wrapping of the sleeve border is clearer in this picture. |
![]() |
| This detail of the sleeve shows what the border looks like on the outside of the sleeve. |
Once that was done I had my cousin come over for a fitting. Unfortunately the chemise was too tight around the bust, and she couldn't easily lift her arms - which was a problem considering she needed to dance in this costume. So, back to the drawing board... After careful consideration I decided not to re-cut the bodice. Instead, I chose to rely on a good old Medieval friend again: the gusset.
As I will explain in my main article tomorrow, gussets can be used in a variety of ways to expand seams where extra movement or give is necessary. These are not to be confused with the godets mentioned above (more here).
| Side view of chemise with arm raised, before expansion... |
| ...and after the expansion. |
Before I added the gusset, the area pulled and tugged around her bust and bicep. After adding the gusset, it fit quite well. I think it's clear from my illustration exactly why it is called a kite gusset.
Once I finished fitting the chemise the second time, I had only to finish the neck. I decided to use bias for that. I made two eyelets near the center of the front bias, then wrapped this around the front of the chemise, where I had already attached the two pieces of cording.
I think the whole thing turned out pretty well, and I heard the dress received nothing but compliments at her Medieval Fair. She was the only one there with a home-made costume.
Stay tuned for the final installment in this exciting series: Pictures!
Nostalgically Yours
Monday, July 5, 2010
Summer Project #1 - Medieval Dress - Part II
If you haven't read the first part of this project, you can do so here.
So, now it was on with the pattern! Thanks to the book I won with my Senior Thesis collection at my High School vocational program, Patternmaking for Fashion Design by Helen Joseph-Armstrong, I have a valuable resource on modern pattern making for all of my sewing projects. However, I really wanted to do some research on authentic patterns of the Medieval period in order to get the fit of a real medieval gown. The internet gave me lots of great information, including some stuff I already knew like the popularity of godets. In retrospect I would have liked to have drafted the whole pattern from some similarly-shaped gowns I found online, but after measuring my cousin I noticed she would fit right into a shortened version of the size 6 block I had made in my Sewing Class at AAU last semester.
Can we just let that sink in for a second? My 11-year-old cousin fits into an industry standard size 6. What exactly does that say about our standards of beauty? Moving on...
Since I was using my block, I reverted to HJA's book for a silhouette that mimicked the Medieval look. I definitely wanted no darts in the dress, but she needed enough space to dance in it, too. Conveniently enough, there is an entire section in the book dedicated to "Dresses without Waistline Seams", all based on the torso foundation. First I started on the chemise. I decided on a box fit dress: A non-fitted shift without any fish-eye darts. The problem here was what to do with the bust dart, which is still required for the dress to actually contour the bust. Here's where I got clever. Having read that drawstrings were a very common closure in Medieval tailoring, I decided to transfer the bust dart upwards, create added fullness, and have a drawstring across the center front. Brilliant, I know. Here are some illustrations to show my work:
Here I show where I transferred the dart.
Here I've transferred the bust dart upwards, closing the one on the side. I've also eliminated the back shoulder dart, ensuring the shoulder seam is trued. Finally, as per the directions in the book, I added a half inch to the waistlines, blending to zero on the hip and side seams.
Here I re-drafted the necklines. The front is curved to allow for the bust fullness - once drawn in with string it will lie straight.
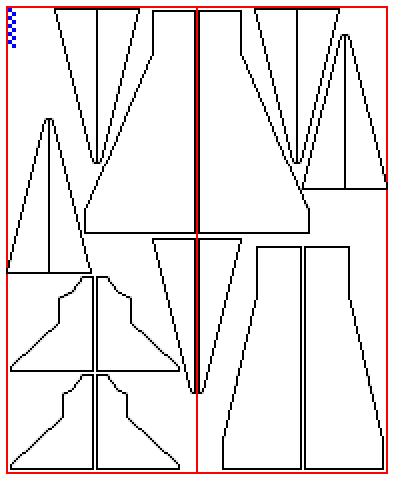
For the gown I knew I wanted a lot of fullness, and the fitting wasn't important anywhere but the arms and shoulder, so I went with a tent dress. This is the same basic principle as a flared skirt, except instead of converting just the skirt darts to flare at the hem, one converts all of the darts on the torso foundation to flare by slashing like so:
First I cut along these slash-lines...
...and opened the darts downward, widening the body and the hem...
...and finally I redrafted the neckline to match the chemise.
Don't forget the sleeves! For the chemise I simply redrew the block without the elbow dart. Above you can see what I did for the gown: I redrafted the outer lines to make the long opening at the wrist that was so fashionable back then. Also, I slashed the sleeve down the middle to create an opening along the top of the arm. Here I intended to put in more lacing so the sleeve could be worn open or closed!
As I mentioned, I had done much research in terms of Medieval construction. So none of the gown's pattern pieces were on the fold. "Why?" you might ask. Simple: four seams instead of two allows more room for godets. Also, the closure was intended to be lacing up the front of the gown, so that required an open seam.
Now that I had my patterns designed, my next step was to cut everything out. Some of you might be noticing by now that I have omitted the pattern for the sideless surcote. As it happens I was running very short of time at this point, so I decided instead to make a somewhat more elaborate gown.
More later.
Nostalgically Yours
Read Part III
Food for Thought - Project Management
A teacher once told me something about costume design that I think really is an almost universal truth. In any project we aspire to save as much time and money as possible while still putting out a decent product. However, this is not completely possible.
This diagram illustrates my teacher's point: you can only ever really have two of these. A well-made product is almost never both cost and time-efficient. In order to save money, one must usually use up time - perhaps waiting for a sale or driving to a cheaper store. In any case, this applies to this project as well, and since I am never willing to give up the well-made circle, I will always have to spend extra time or extra money to create a product.
Think about it.
Nostalgically Yours
Monday, June 21, 2010
Summer Project #1 - Medieval Dress - Part I
I finally was able to delve wholeheartedly into my blogging... I'm going to start with my first project for the summer - a Medieval dress for my cousin's "Medieval Feast". I did some preliminary research in two books I already own: Le Costume Français, by Flammarion publishers, and Costumes for the Stage: A Complete Handbook for Every Kind of Play by Sheila Jackson. I also did a little bit of research online, but outside of Costumer's Manifesto, most of what I found were either a pastiche or were Medieval-inspired. Anyway, I came up with some basic sketches - a selection of silhouettes and styles ranging from about 1200-1400ca.
Being a stickler for accuracy as I am, I was surprised to find my research was incorrect, and that I had made a mistake in my terminology. What I called the kirtle was, in fact, the smock or chemise in the outfit.

Anyway, of the outfits I designed, she seemed to lean towards design C. We attempted to really gel the design, but I never feel confident in deciding a design until I've chosen the materials.
Fabric presented a challenge for this project, since my budget was literally zero dollars, unless I wanted to use my own funds. So it was up to the attic with me, where my family keeps the discarded or unused remnants of projects past. Among such horrors as fuchsia moiré satin and faded pea-green lace seam binding, were a decently-sized group of contenders. With some guidance from me, my cousin chose a cream satin-back imitation-silk polyester, and a maroon broadcloth for the surcote. Though I had found a white linen I wanted to use for the chemise, I opted instead for my muslin because it was more comfortable. Once I had decided on the final fabrics, I was able to solidify my design, since the fabric choice ultimately dictates what one can accomplish.

We finally decided on a chemise, gown, and side-less surcote. Because of the limitations of fabric, I thought I wouldn't have enough fabric for a wide skirt and sleeves. So many of the designs above that feature large sleeves have straight skirts with large slits down the sides. The concept being that the surcote would cover the slits in the gown, so it wouldn't be noticed when she wore it.
More later!
Nostalgically Yours
Read Part II and Part III!

.jpg)
.jpg)
