Showing posts with label sewing. Show all posts

Friday, October 1, 2010

Halloween Costumes - Lady Gaga

I figured I should start off the month with a real bang, so here she is:


24-year-old Stefani Germanotta - aka Lady Gaga - exploded onto the music scene only a few years ago with her hit single "Just Dance". Since then she's become an international phenomenon not only in the music industry, but also in pop culture. She also dapples in politics as seen by her recent involvement in the Don't Ask Don't Tell debate. Gaga has always been an almost endless source of inspiration for Halloween costumes, and this year is no different! Here are some ideas if you go the Gaga route:


(A) Gaga Meets the Queen!
In making this you'll probably want to avoid latex since it's very difficult to work with and is not the most comfortable thing to wear. You best bet for finding anything like this is a thrift store. If you can't find something with these sleeves, inflate a beach ball and paint it red (be sure the paint is rubber-friendly!). Once it's dry, cut holes in the bottom and upper side to attach it to the dress. The effect will be more like this, but it's in the same style. You might have to use some stuffing to keep it from drooping too much - newspaper is a cheap option, but might be noisy. I recommend using tulle or another stiff fabric. The collar is an altered centerpiece from a party store, like this one. The red eye things can be done with glittery red makeup. A pair of red sunglasses could probably also work.

(B) The VMA Meat Dress
Of course this is going to be one of the most popular Halloween costumes this year. To make yours you'll need an alternative to raw meat, unless you'd like to go über-realistic, which I don't recommend. Instead, try and find a meat-themed novelty quilting fabric. If this is unavailable, you'll have to find some pink or white fabric and go at it with some fabric markers until you've got that meaty feeling. For a more tongue-in-cheek effect, I'd recommend a touch of the ridiculous with a squeaky toy hat in the shape of a steak or hamburger, and a bacon wallet. You can also round off the look with some sausage links made by stuffing a meat-colored stocking and tying it off every so often. (See next for hair)

(C) Gaga in Alexander McQueen at the VMAs
Take a thrift store gown (preferably in red) and use fabric paints to achieve the medieval panting look. After letting it dry, use heavy thread or safety pins to gather the skirt up onto one hip if you want to show off your armadillo heels. You can always leave the skirt down if you so desire. If you're averse to making a black tulle petticoat, whipstitch large bunches of black tulle under the hem of the skirt, to give that illusion. The armadillo heels can be achieved with a mesh and papier-mâché armature that fits over a pre-existing shoe and ties around the ankle. For the hair, get a platinum blonde long wig and dye the ends blue. For the headdress, find a plastic headband and hot glue some feathers sticking directly up (this may require some wire to stabilize them). Then spray paint the entire thing gold.


Here is Gaga's latest video: Alejandro (NSFW)


(D) The "Alejandro" Gun Bra
Take those high-waisted black wide-leg pants out of your closet ladies! If you don't own a pair (shame on you, they're incredibly slimming) then a trip to your thrift store will probably yield many results. If not, then any black pants will suffice. Purchase a cheap bra at any outlet store, and find two plastic toy guns (preferably with long barrels). You may have to use a saw for this, so be careful! Remove the barrel from the rest of the gun. Be sure to file down any sharp edges to avoid cutting yourself later. Put the bra on to test where you want the guns to be placed - remember they will be held up by a strap, so just make sure they're pointing the right way. Have a friend help you mark the positions of the barrels and make sure they're even. Take off the bra and crazy-glue the guns in place and let them dry completely. A simpler alternative is to use two paper towel tubes painted black. Use a luggage strap like this one to connect the two ends of the guns across the back of your neck. The rest of the bra straps are ultimately optional, but can also be achieved through the clever use of straps. Finally, a blonde version of this wig finishes up the look.

(E) The "Alejandro" Priestess
At your local thrift store, find a white lab coat, graduation gown, or seminary robe. Don't use a terry robe. You probably won't find something hooded, so also find something with a hood that is already white or that can be bleached. Remove the hood from the sweatshirt and attach it to the robe. There are three options for the red edges and crosses: sewing (slow), paint (messy), or duct tape (potentially tragic). I recommend the last option because is will give that rubber feel without the discomfort of actually wearing rubber. Always remember to double-side duct tape that comes in contact with your body. You will be sorry if you don't, especially with these panties.

(F) "Alejandro" Dancers
This is good for your more "conservative" or "male" Gaga fans. It's a very simple costume- biking shorts or cut-off leggins pulled up extra high, a pair of combat boots and this wig (all in black). You could also switch out the boots for fishnets and high heels if you so choose.


Here is Gaga featuring Beyoncé in "Telephone" - NSFW!


"Telephone" Prison Glam
Get out your hot glue guns, people! You'll need an over-sized black leather jacket, black knee pads, and a black bra and panty set. Using a boat-load of glittery gems and rhinestones from your local craft store, bedazzle everything to your liking. Let them dry. After that, prepare some cans for your hair. Make sure they're clean! Rolling your hair around them might not be enough to keep them in all evening, so you may want to anchor them with bobby pins - you can do this by poking holes into the can and inserting bobby pins. Don't forget the finger gloves - take a pair of cheap faux-leather gloves and cut across the hand, just above the thumb. If you want to trim them smaller, be sure the finger portion of the glove remains completely intact! Then, add fishnets and some knee-high boots and you're done!

"Telephone" Crazy Chef
This one will also involve some work. You'll need to find a sort of translucent plastic to cut and glue into the bodice. She's actually wearing an apron over a matching skirt, but the skirt can really be anything you like, since it's mostly hidden by the apron. Be sure the plastic is stiff, but not so stiff that you can't sit down or walk comfortably. Also be sure that you don't hurt yourself while cutting it out and gluing - always make sure to file down sharp edges! Since the outfit is translucent, you can go all the way and just wear the medical tape crosses over your nipples. If you'd like a touch more modesty, though, you can always wear the tape crosses on a nude bra. The hair might also pose a challenge. As you see in the video, she wears a couple of different headdresses with this outfit, so you'll have to pick and choose what you want on your head. Since that blue contraption might be hard to make, I recommend the latter of the two. If you're not up to making a phone out of hair, you can always just buy one of those toy phones to wear as a hat. Don't forget your bottle of "poison", as well!

"Telephone" Caution Tape Bikini
This is probably the simplest of the three. All you'll need is a roll of caution tape, which I've seen at party stores, but might also be available at military surplus stores. Over a nude bra and panty, just go crazy with the tape! To affix it to your person, use bobby pins around the underwear, and any other tape you use should not come in direct contact with your skin. Use it only on the Caution Tape itself.


Last, but not least, "Bad Romance"! (Also NSFW)


(J) The "Telephone" Escape Costumes
Another costume for friends or couples. These are the... things that Gaga and Beyoncé wear as they escape in the video. Buy two big floppy hats. They should have wire in them for shaping, but if not that's alright. With the hat on, have a friend measure your height (in inches) up to crown of the hat. Double that height. Now find out how many yards that is - never round down in these situations, you can always cut away, but it's harder to add! For instance: I am 6' tall. With a hat, I might be a total of 75". Double that and you have 150"; 36" to a yard, and I would need about 4 1/4 yards. Anyway, purchase your required amounts in a cheap polyester chiffon (black for Beyoncé and light blue for Gaga). Fold the fabric in half lengthwise and sew one selvage shut. Drape this over your hat and self with the open side facing the front. Add a belt and arrange the fabric to your liking and comfort (make sure you wear something underneath as chiffon is quite shear). Finally, purchase some fishnet stockings that match the fabrics and cut them into gloves - there you go!

(K) The "Bad Romance" Monster Costume
For the main part of the costume, you'll want to find a white body suit. For the headpiece, take a slightly too big white bathing cap and cut two holes for the eyes. Use some card-stock to make a white pointy paper crown. The shoes might be a bit tricky, but anything from white pumps to costume go-go boots, to the white anime boots available at party stores can work. Use whatever you can find. Do be aware that this costume has been referred to as the "sperm costume". If you wear it, be prepared for some unsavory humor.


Just so you all know, this was technically a total of eleven ideas. I won't be posting this many in a day again. If you have any specific questions about any of these costumes or their construction, please feel free to contact me! Also, remember to pass this on to your friends if you think they'd like it and check back all this month for more great costume ideas.

Happy October!
Nostalgically Yours

Enhanced by Zemanta

Thursday, September 9, 2010

N'Awlins - WHO DAT

As I sit here typing away, dripping an afternoon rainstorm off into a puddle on the floor, I contemplate the wonder of Saints spirit here in New Orleans. A spirit I have yet to encounter anywhere else in my world travels. When I had to go to an Emergency Care center a few weeks ago due to a nasty infection, upon leaving I was greeted by a nurse who said: "Here you are, sir! Your prescription, our card, and a Saints schedule!". At the bank last week we were offered official Saints fan debit cards. The pharmacies and supermarkets here have entire aisles dedicated to Saints paraphernalia!

Yesterday my sister came home from school excited because they had announced today as a "free jean day". Here in the city most schools require uniforms, but have special days when students may wear jeans as long as they bring a dollar. This jean day was special, though. Students were allowed to wear jeans free of charge as long as they wore a Saints t-shirt. Aside from confusion on my grandmother's part (Which saint is she supposed to dress up as? Saint Catherine? Saint Joan of Arc? How could they do this on such short notice?!?), we were all rather excited about her getting to dress up for the Saints season kick-off. Of course, being the seam-monger that I am, I insisted I decorate a shirt for her myself.

So, she looked through her closet and found a plain black t-shirt while I dug through my fabric bin to find the remnants of last year's Halloween costume (if you have me added on Facebook you can look through my pictures, otherwise you'll have to wait 'til my Halloween costume posts later in the year). Then, I stayed up until two in the morning appliquéing gold brocade onto black jersey, and here is the result:


(Those are my coffee and beignet Mardi Gras beads, by the way)


The t-shirt features the traditional "Who Dat" chant, which is a short section of the entire thing:

"Who dat? Who dat?
Who dat sayin' dey gonna beat 'dem Saints?"


Another popular slogan is "Geaux Saints!", but that involves too many letters for me, thank you very much.

In short, I'm quickly falling in love with New Orleans. This is certainly the first time I've actually been interested in football, and that's certainly different. There's something about this place...


More later,
Nostalgically Yours

Friday, August 20, 2010

Project Runway Review - Philip Treacy Challenge

This review contains spoilers. If you have not seen this week's episode, you may do so here.

So, this week’s challenge was to create a look inspired by a hat designed by Philip Treacy. Yes, you did read that correctly. Philip Treacy was the guest judge on this week’s episode! If you’re not having a hat-gasm right now, let me give you the background on this incredible artist.
Philip Treacy is the foremost milliner of our time. Discovered by the late Isabella Blow in the late 80s/early 90s, Treacy has become the most famous hat designer in the world. He has created hats for designers such as the late Alexander McQueen (also a disciple of Isabella Blow), Valentino, Karl Lagerfeld, Ralph Lauren, and Donna Karen. His hats have been worn by such prominent celebrities as Lady Gaga, Sarah Jessica Parker, and the Duchess of Cornwall. After receiving countless awards throughout his career, in 2006 Treacy launched a collaborative collection with Umbro, a British sportswear supplier. Like Alexander McQueen's designs, Treacy's hats push the boundaries of the everyday and have made him today's most avant-garde milliner. Here are some of his designs:


Philip Treacy (right) and Isabella Blow (left, wearing Treacy's hat)


Needless to say, the hats were positively stunning. I did feel bad for Kristen, though. Her hat was literally a gigantic orchid and she pointed out, it’s difficult to treat such a literal inspiration. However, the schlep she turned out was in my humble opinion completely inexcusable.
Micheal Costello is proving to completely fulfill my prophesy of being the annoying contestant who's generally safe because he causes a lot of drama. More on this jerk later.
The other Michael is proving to be my favorite contestant. Most of you probably know that this decision has almost nothing to do his talents as a designer and a lot to do with the fact that he wears a tank top really well. I have a similar appreciation for Christopher Collins... Don't judge me!

The bottom and top three were really surprising. It was one of the first times I really couldn’t guess what the judges were going to say. I was expecting April, Chris, and Michael C. to be the top three, but only one of them (Michael C.) actually made it in... The top three were Valerie, Michael C., and Michael! They ripped on poor April, who had a great concept though her execution wasn't the best. I was shocked that the judges liked Valerie's design. I agree with Mr. Treacy when he said there was no correlation between the garment and the mask. Though I appreciate what she said about an evening gown being expected, here is my idea for Treacy's mask:


The mask reminded me of the vintage Maidenform Bra ads, so I went with a classic silhouette in a vibrant orange with a layered chiffon skirt.


I wasn't surprised that Kristin got booted this week. As I mentioned before, her garment was a mess. I would have been ashamed to send something like that down the runway.
I hope I wasn't the only one who screamed at his television set when they announced that Michael C. had won. It was completely ridiculous, and as Mondo pointed out at the end of the program, we're never going to hear the end of this. I'm certain that the producers stepped in and asked that he win to create conflict between the contestants, and no, I'm not just biased towards cute Michael, I really think that from a design standpoint he deserved to win. I really enjoyed the look on Ivy's face when Michael C. told them he had won. To quote her: "What the ----?!?".
Did anyone else think Mondo's design should have been in the top three? I know it was completely out there, but the challenge was, after all, to compliment the hat and not let it completely take over. I really like his design. I also thought that Ivy's jacket deserved an honorable mention. The draped back of her jacket was gorgeous! I would totally wear it.
I really enjoyed this week's challenge, despite the outcome, and perhaps the appearance of these major celebrities is an indication that Project Runway isn't, in fact, dying, but will actually be around for quite some time.

Hope you enjoyed it!
Nostalgically Yours

Photo Credits:
Lasplash
Nicola Formichetti
Vogue UK

Saturday, July 31, 2010

Murphy's Laws For Sewing

These were given to me by my Fashion Design teacher at Fairfax Academy for Communications and the Arts. Lots of fun, and very true:

  • Invariably, the seam you wanted to take out is not the one that actually gets ripped out.
  • The pattern you want to copy or alter will invariably be missing a key piece.
  • The fabric you forget to pre-shrink will always shrink the most in the wash.
  • Fusible interfacings will always fuse to the iron.
  • The overlock machine only eats the last seam on the final garment.
  • If you need six buttons in a pinch, there will never be more than five in your sewing box.
  • Permanent stains will always occur in the most visible and obvious places.
  • Fabric dye will always leaves streaks on the intended fabric, and stains on everything else.
  • When pricked with a pin or needle, the amount of blood that ensues will be in direct proportion to the cost of the fabric.
  • If you have to drop something out of your sewing box, it will inevitably be the box of pins without its top.
  • The bobbin thread will only run out when things are running smoothly.
  • Your lost needles and pins will only be found when walking barefoot.
  • Since opposites attract, facings will usually be sewn to the wrong side, and darts will be sewn inside out.
  • The collar points will always match until you've trimmed away all seam allowances.
  • The iron never scorches a garment until its final press.
  • The steam iron only burps rust onto light-colored fabrics.
  • The light on your sewing machine will only burn out late at night.
  • The threads in a gathering stitch will only break in the middle.
  • The scissors cut easiest past their intended stopping point.
Hope you seamstresses and seamters out there enjoyed this. Nostalgically Yours

Thursday, July 29, 2010

Sewing Tips Series #2 - How to Let Out a Blouse

One of the most common complaints amongst my friends when it comes to finding clothes that fit in stores is a lack of accommodation for women who are anything over an A cup. Well, if you're one of these women, and if you've got a sewing machine and a basic understanding of sewing, then I've got a solution that's relatively easy and minimally invasive.

In my posts on the Medieval Gown (Part I, Part II, Part III), I mention a popular feature of clothing in this period: the gusset.

For those of you that didn't read the Medieval Gown articles, a gusset is a piece of fabric cut on the bias that is usually shaped as a triangle or a variation thereof. This piece of fabric is then inserted into a seam wherever extra breadth is necessary. In modern times, gussets are most commonly used in the crotch of a pair of pants.


The gusset should not be confused with the godet. Though they are cousins, two major differences separate them:
  1. Gussets serve a fitting purpose, whereas godets only add flare and are more decorative.
  2. Gussets are cut as a variation of a triangle, whereas godets are always a circular sector.

On with the show. My aunt had a similar complaint to ones I mentioned at the beginning of the article. A blouse she loved was too tight in the arm and the bust and when she saw how I solved the problem for the Medieval Gown, she wondered if I might do the same for her blouse. The first thing I needed to do was to find extra fabric to use for the gussets. Here are some ideas:


Use a duplicate. For instance, if the blouses were on clearance for dirt cheap. Then you can convert one of the tops into something else.


Buy some fabric. It can either match the rest of the garment or act as an accent for it.


Use part of the existing garment. This is what I did with my aunt's blouse.


The first thing I did was to take out the side seam and the underarm seam, while keeping the sleeve attached to the bodice. Luckily, most manufacturers attach the sleeve before closing the side-seam, so this shouldn't be too much of a problem. You might have to take out the hem of the sleeve, as I did, and you may have to mess with the hem on the bottom of the garment. Remember, if you're doing this to a dress, especially at the waist, you don't necessarily need to take out the entire side-seam.

Next, I cut out the section of the sleeve I was going to use for the gusset. I used my grid ruler to cut out the shape, and to ensure both gussets were the same size:


Just make sure you true everything before you finish, to avoid having to rip seams:


That's it, really. Once you've cut out the gusset, it's simply a matter of placing it correctly and sewing it in. I give more specific instructions for insertion in my Medieval Gown Post.

Also, just a quick tip: when using kite gussets it's important, though not imperative, to make sure every corner touches or meets a seam. This avoids bunching and gaping that can occur if you put a corner into a smooth seam. If you have to put a gusset where it does not intersect a seam, then use a softer oblong shape instead:


Hope this helps!

Nostalgically Yours
Enhanced by Zemanta

Wednesday, July 28, 2010

Summer Project #1 - Medieval Dress - Part III

Well, it's been a while since I wrote about this, so if you need a refresher or you haven't read the first two parts, please see Part I and Part II.

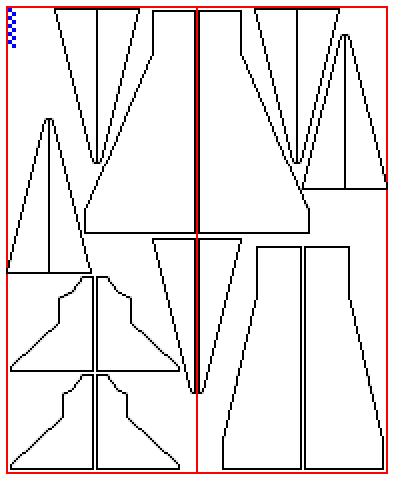
So the cutting was going to be a challenge. I had a very limited amount of fabric and a set number of pattern pieces that I absolutely needed to cut. Since I wanted to waste as little fabric as possible, I decided to create a marker. If you don't know what that is, and/or you wanted a detailed explanation of how I went about making my own makers, you can read that post here. Here's what I ended up with:

Creating my own marker helped me see that I had enough room for five godets!

So I cut out all the pieces and started sewing them together. I first attached the godets to the dress panels, aligning the bottoms (which would later turn out to be a mistake). After the godet was inserted into the open seam, I pinned up from the point of the godet up the rest of the seam, like so:

1) Lay out the godet within the seam, not forgetting to true your pieces so the ends all match up nicely.
2) Pin and sew the godet to one side of your seam, right sides together
3) Now do the same with the opposite side.
4) Finally, close the rest of the seam - if you're ambitious you can combine steps 3 and 4.

Of course, I managed to forget to true the seams, so I ended up with this:


Neither of my seams matched up...


So after I re-finishing all the seams and godets, I cut the sleeves and inserted them. I decided the gown needed something more, though, so I went out to my local fabric store to pick an elegant lining for the sleeves. I was very lucky to find the perfect fabric on sale for $5/yard. It had an elegant border which I decided to use to my advantage.


By placing the sleeve pattern right against the decorative border, once I set the sleeve in, I would be able to wrap the border around to the exterior side. I also used some of the border along the open top seam of the sleeves and around the collar. Here is the end result:

The wrapping of the sleeve border is clearer in this picture.

This detail of the sleeve shows what the border looks like on the outside of the sleeve.

Once that was done I had my cousin come over for a fitting. Unfortunately the chemise was too tight around the bust, and she couldn't easily lift her arms - which was a problem considering she needed to dance in this costume. So, back to the drawing board... After careful consideration I decided not to re-cut the bodice. Instead, I chose to rely on a good old Medieval friend again: the gusset.
As I will explain in my main article tomorrow, gussets can be used in a variety of ways to expand seams where extra movement or give is necessary. These are not to be confused with the godets mentioned above (more here).

Side view of chemise with arm raised, before expansion...
...and after the expansion.

Before I added the gusset, the area pulled and tugged around her bust and bicep. After adding the gusset, it fit quite well. I think it's clear from my illustration exactly why it is called a kite gusset.

Once I finished fitting the chemise the second time, I had only to finish the neck. I decided to use bias for that. I made two eyelets near the center of the front bias, then wrapped this around the front of the chemise, where I had already attached the two pieces of cording.

I think the whole thing turned out pretty well, and I heard the dress received nothing but compliments at her Medieval Fair. She was the only one there with a home-made costume.

Stay tuned for the final installment in this exciting series: Pictures!


Nostalgically Yours
Enhanced by Zemanta